Teach You How to Measure the Handlebars Correctly
weisenweisen
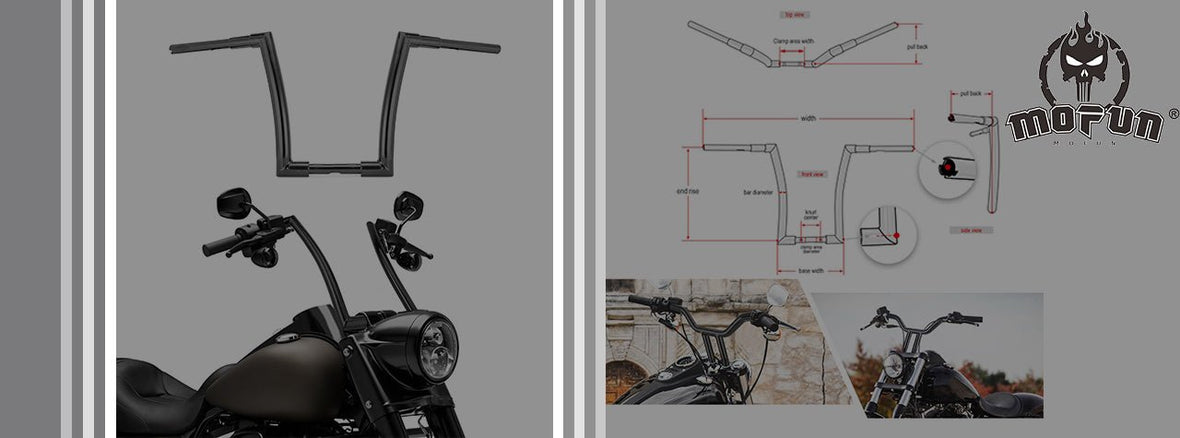
MEASURING HANDLEBARS
Handlebars can add plenty of personality to your bike but it's important to understand the size differences before making a decision on your new set of bars.
Here we'll cover some of the basics to narrow things down and ensure proper fitment for you and your bike.
Check them out on the diagram below, and see further down for an in-depth run down on each item.

Bar Diameter: Make sure to measure this at the Riser
Clamping Area width: This is where the handlebar bar clamps to the riser on your bike. Be sure to check that your risers are not spaced too far apart to fit this clamping section.
Important thing:
You May need to determine whether the original clamp spacing size is less than or equal to the width of our handlebar clamp area. Otherwise, the original clamp will touch the raised position of the bar, making it impossible to install.

Clamp Diameter: Be sure to measure the size of the clamping area of the tube diameter near the knurling.
As far as industry standards, Handlebars typically come in either 1" or 7/8" diameter. Almost all Harley applications will use 1", however, for those riders looking for fatter bars 1 1/4" and 1 1/2" are available and may require special clamps/hand controls depending on the bars.
End Rise/Height: As the name suggests the height is from the base to the top of the end rise as shown in the diagram above. Before you start, you need to find a reference to put the handlebar vertically on the ground before you start measuring.
Note: If your original handlebar is U-shaped with a Clamp, and you need to replace it with a T-bar, then you cannot choose the same size as the original. You must choose a bar that is 2" higher to maintain the same height as the original.
Overall Width: Measure straight across from one grip tip to the other grip tip.
It is a good idea to measure the width of your current handlebars, and compare with the new ones you are looking at.
Pullback: Measure straight back, the distance from where the handlebars mount to where the grip tip ends (bars must be positioned at the angle they will be mounted on the bike)
Smaller stature and/or shorter arms may call for a little more generous pull back length, or can help to sit you more upright on the bike and stop leaning forwards to reach the bars.
Base Width: Across at the base of the handlebar
Knurl Center: This refers to the area where the bars clamp down on the risers. You may need to measure the distance between the two knurls.
How to confirm that the measurement height is correct?
The correct method of measurement requires ensuring that a few points are noted:
- Measure straight up, Do Not Lying flat on the Ground.
- Measuring it from the bottom of the bar to the middle of the end rise

Handlebar Wiring: Plain, Dimpled, Internal Wiring
It's a good idea to note how the wiring is run on your current handlebars. Harley's will use either a Dimple or Internal Wiring for electronic throttle applications.
Plain:
Plain or Smooth Handlebars have no features or holes in their handle-grips. In this handlebar wiring set-up, the electrical wiring is run externally (usually zip-tied to the handlebars).
Dimpled:
There will be a Dimpled machined in handlebar. It allows the wires to pass underneath the switch housing and lever mounts, and then run externally (down the outside) of the handlebars.
Internal Wiring + TBW:
Internal Wired handlebars have slotted holes machined in them, allowing the electrical wires to be routed through the inside of the handlebars.
If you’re unsure which option is required for your bike, feel free to contact us.